Wednesday, July 1, 2009

Fruits of Our Labor

Some of our first fruits.
alternative text
Clockwise from 12 o'clock: banana pepper, green beans, squash, jalapenos, and yummy bell peppers.

Thursday, June 25, 2009

Our Garden, June 2009

We've planted a vegetable garden behind our house. It has been a lot of fun, though hard work, and we are already seeing some fruits of our labor.

We are growing 2 types of tomatoes, 2 types of corn, 2 types of pumpkin, 2 types of sunflowers, zuchini, squash, jalapenos, banana peppers, yellow bell peppers, basil, parsley, cucumbers, okra, and strawberries this year. We planted them just outside the back door and in the circle in the middle of the driveway. Everything is showing signs of fruit except the cucumbers and okra. Well, and the strawberries that we are intentionally not allowing to fruit so that they will grow a larger patch.


I wanted to show you how some of the plants have grown in one month.

Tomatoes, corn, and sunflowers

And more pictures from our garden:
montage
In order from top: 1.) the first female pumpkin shoot (fruit);
2. & 3.) our first harvest---jalapenos & green beans;
4.) the snake that lives in the garden;
5.) Erin weeding;
6.) Bill in strawberry patch.

CREDITS:
Font: Kitty Weed by KevinandAmanda.com
Garden Tools: from "Arbor Day" by Faith True (SYTYCD challenge at digiaddicts.com)
Date Stamp and Days: from "Project 365 Essentials V.1" by WM[squared]
Slide Picture Frame: by Gunhild Storeide

New Tile in the Mudroom

Bill and David worked hard on our mudroom one weekend in early May. They tore out some of the old shelving, but left the top shelf that runs along the far end of the room. Then they ripped up the old floor. They put down new under-layment and then put down a beautiful gray limestone-looking tile.

Here are pictures of the work in progress.
alternative text

Below is the finished project. Isn't it beautiful?
alternative text

Wednesday, May 27, 2009

Replacement Radiators

Let me just tell you, we have had a rough time this year with our heating system!!!

We had a freeze in the pipes which caused huge holes in a long section of pipe underneath the house, damage to our furnace, and burst radiators in one room. The burst radiators leaked and damaged the floor. It was an ongoing problem for a couple of cold months and we went without heat for over one weeks time, all added together. Quite a headache! The house is becoming such a money pit.

Anyway, we had to remove the old cast iron radiators in the library. Temporarily we had a copper pipe running along the edge of the room to keep the system's circuit complete so that we could continue using heat downstairs. Well, we finally had that replaced yesterday.

We had aluminum radiators installed. They are a little smaller than the cast iron ones, and look very nice.

alternative text

The next steps are to remove the old wallpaper and paint the room; and to repair the damaged floors.

damaged floors

New Blinds in the Kitchen

I spent about two weeks in February/March making balloon shades for the kitchen. They are made of a cream colored eyelet cotton material. I bought the internal parts from an online roman shades store. I lined them with light filtering thermal lining which should help to keep the kitchen cooler in the summer time when the HOT sun beats down on that side of the house. I had a lot of fun making them and love how they turned out.New Balloon Shades in kitchen

Sunday, December 28, 2008

New Project: The Kitchen.

We have moved on from the living room to the kitchen.
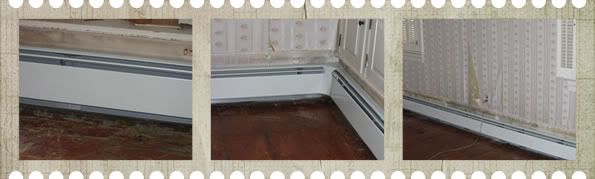
The way the kitchen looked when we first moved in.
When we first moved in we removed the really ugly wood paneling from the kitchen. It was dark. It made the room that I think should be bright and cheery and easy to work in feel more like a dungeon. So we pulled the paneling down. Underneath we found cute old farm wallpaper. We did not know what to do with the wallpaper. It seemed too precious to rip off or cover up. So we left things as they were for a while. But finally decided we could not leave it in a half-finished state any longer.
Kitchen wall with paneling removed.

Bill came up with the idea of putting the paneling back up and covering it. Bill and his brother, John, filled the gaps in the paneling with Spackle. Then they sanded it down.
Paneling is back up, it has been Spackled, and John is sanding it.
(Click on any picture to view a larger version.)


Afterward, Bill primed the wall and radiators.
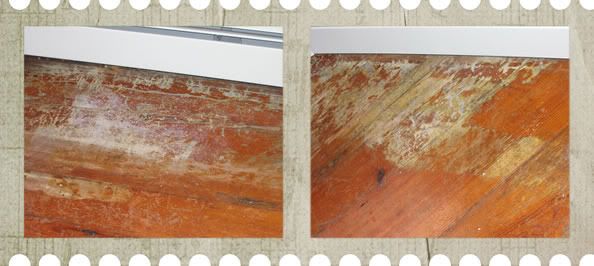
Unfortunately, the wood stain from the paneling seeped through the three layers of primer.

A close-up of the stain coming through the primer.

Then I painted the wall with Valspar Satin color Churchill Hotel Maple. It looks nice.There is more work to do. We are actually going to pull off another piece of paneling and fill in the wall and paint it. There are a couple of walls with wallpaper that we will remove and paint. And Bill will install trim.

Monday, December 22, 2008

Christmas Cards

We are having "house" issues today, so I feel silly putting up a cute little blog entry, but I really do not know what to do with myself while Bill deals with the immediate effects of the issue. One of our copper pipes got a leak and spewed hot water all over the utility room---it blew with such force there is a spot where there is no more paint or paper (or whatever was covering the wall). There was about 1/4 inch of standing water when I discovered the leak. Bill rushed home to turn off the valve (I do not know what I am doing!!). Then trekked out to Home Depot for a *consumer report* recommended shop vac to clean up the water mess. We still have not called the plumber to fix the problem, but Bill is going to see what he can do to temporarily fix it so we can have some hot water tomorrow morning. What a stressful day!

So on to the focus of this blog entry.
The front of the Christmas card

Bill and I made homemade Christmas cards this year. They were simple, cheap, and fun to make. I cut out the shape of a holly leaf onto green fabric using clip art. Bill cut the paper in half to make it "card sized". I scored each of the cards with a bone folder, so they folded very nicely. I sewed the holly leaf onto the front of the card using red thread. The thread represented the vein in the leaf. Then I used a pencil eraser and a red rubber stamp pad and stamped holly berries around the top of the leaf.

On the inside, Bill---the master stamper---stamped one of three messages: Merry Christmas, Celebrate the Season, or Joy to You.
The inside of the card

Behind the scenes of my photo shoot, Lillie and Cole had to stick their noses in. So I took a quick shot of them too.
"Behind the scenes"